Basic Auth using Firebase, Nodejs and ExpressJs in 2022 [updated!]
Beginner's Guide.
There are lots of articles already on the internet that talks about how to use Firebase with Nodejs but a lot of them are either too old to use or just incomplete for a beginner to follow along with.
One cannot deny the fact that Firebase's official documents are pretty much enough for you to get started but there is something more that might cause an error while setting up the firebase auth with NodeJs.
1. Firebase Console:
i. Create Project
By this stage, I'm assuming you have already created a firebase account and set up your app as web. In case not simply go to firebase.com console. From there click on "Add Project". Enter a Name for your project and create your Project.
After creating your account, Select "Web" and Give your application a name.

ii. Save configuration
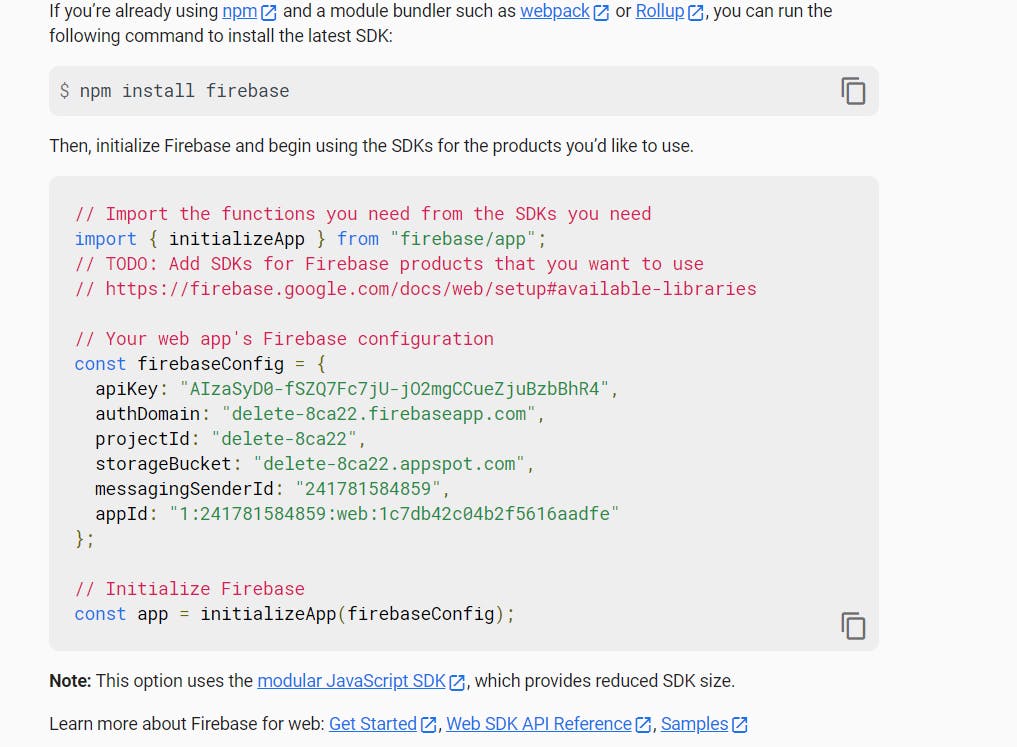
Click on Register App and make sure you copy your Your web app's Firebase configuration and save it to some safe place. We will use this later.

iii. Enable Email authentication
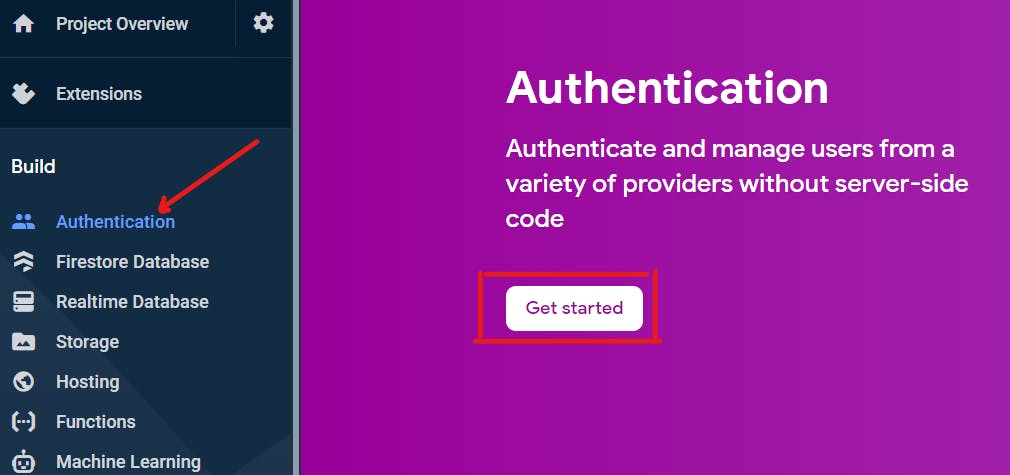
Now choose Authentication from the left sidebar and click on "Get Started".

Under the Native Providers choose "Email/password" then Enable and Save it.
That is pretty much all you need to do on your Firebase console.
2. NodeJs CodeEditor:
Now head over to the Nodejs project and open it in your favourite code editor and make sure you have essential npm packages installed. (i.e. Express, Firebase and probably Nodemon(optional)).
Now create a new file and paste the Firebase configuration you have copied earlier while registering the app.
i. Setup Firebase Configuration
File name: /firebase.service.js
const { initializeApp } = require('firebase/app');

const firebaseConfig = {
    apiKey: "<your-api-key-here>",
    authDomain: "<your-authDomain-here>",
    projectId: "<your-projectId-here>",
    storageBucket: "<your-storageBucket-here>",
    messagingSenderId: "<your-messagingSenderId-here>",
    appId: "<your-appId-here>",
    measurementId: "<your-measurementId-here>"
};

// Initialize Firebase
initializeApp(firebaseConfig);
ii. Change imports
Now, if you have copied code from the documentation or from the Firebase's configuration make sure to change the module import to require.
//change this
import { initializeApp } from "firebase/app";

//to this
const { initializeApp } = require('firebase/app');
If you forgot to follow the above step Nodejs might give you an error while importing this file to the other pages of your Nodejs project.
Now, Import and Initialize this file into your index.js page, before requesting the expressJs API calls.
Filename: /index.js
require('./firebase.service');
You have now successfully initialized the Firebase connection. Now you simply need to create a signup function and pass values to it.
Create a new file /auth.js with Firebase's createUserWithEmailAndPassword function in it and export it.
iii. Create signup function
Filename: /auth.js
const { getAuth, createUserWithEmailAndPassword } = require('firebase/auth');

const register = (email, password) => {
    return new Promise((resolve, reject) => {
        const auth = getAuth();
        createUserWithEmailAndPassword(auth, email, password)
            .then((userCredential) => {
                const user = userCredential.user;
                return resolve(user)
            })
            .catch((error) => {
                const errorCode = error.code;
                const errorMessage = error.message;
                return reject(errorCode);
            });
    });
}
module.exports = { register }
Here, I'm using JS promises to return the result back to the users.
The three parameters which you need to pass into the createUserWithEmailAndPassword are Auth which you can obtain from the Firebase package you just need to call the getAuth() function.
The other twos are the email and password which you can simply pass from your post request to the register function which we have exported already.
To do this, import the register function to your router's page and pass your email and password to the register function.
iv. Create signup route
Filename: /index.js
const { register } = require('./auth');

app.post("/signup", (req, res) => {
    let data = req.body;
    let email = data.email
    let password = data.password
    register(email, password)
        .then((value) => {
            return res.send(value)
        })
        .catch((err) => {
            return res.send(err)
        })

})
You can do the same for the signIn. Create and Export a signIn function and pass the value to it. If you set up everything correctly you will receive the user details with an access token and refresh token in it.
v. Create signin function
Filename: /auth.js
const signIn = (email, password) => {
    return new Promise((resolve, reject) => {
        const auth = getAuth();
        signInWithEmailAndPassword(auth, email, password)
            .then((userCredential) => {
                const user = userCredential.user;
                return resolve(user)
            })
            .catch((error) => {
                const errorCode = error.code;
                const errorMessage = error.message;
                return reject(errorCode);
            });
    });
}
module.exports = { register, signIn }
vi. Create signin route
Filename: /index.js
const { register, signIn } = require('./auth');

app.post("/login", (req, res) => {
    let data = req.body;
    let email = data.email
    let password = data.password
    signIn(email, password)
        .then((value) => {
            return res.send(value)
        })
        .catch((err) => {
            return res.send(err)
        })
})
Now, you can send the tokens back to the frontend and save them to the localStorage or Cookies and use it according to your requirements.
Subscribe to our newsletter and receive more amazing articles like this directly to your email.
![Basic Auth using Firebase, Nodejs and ExpressJs in 2022 [updated!]](https://cdn.hashnode.com/res/hashnode/image/upload/v1647811806027/EN3yDTOyG.jpg?w=1600&h=840&fit=crop&crop=entropy&auto=compress,format&format=webp)